Flutter - Using TabBar & TabBarView- Creating TabBar in Flutter

If your application needs to display some contents, it's quite common to
separate the contents into multiple tabs. In Flutter, creating
such a layout can be done easily thanks to TabBar and TabBarView
widgets. TabBar is used to create the tabs, while TabBarView is used
to define the content of each tab. Flutter already handles how to switch
between tabs, which makes it easier for us. In this article, we will see How to
Create a Beautiful TabBar using TabBar and TabBarView widgets.
if you want to watch the video Click Here
(you can use this source code anywhere you want )
Basic Usage
Provide a TabController
TabBar and TabBarView require a TabController to work. There are
two different ways to provide the controller.
The first one is having a DefaultTabController and The Second is You Can Create A Custom Controller to Programatically move through each Tabs which means if you want to move through Tabs by Pressing a Button You can use the second method, we create Both methods here
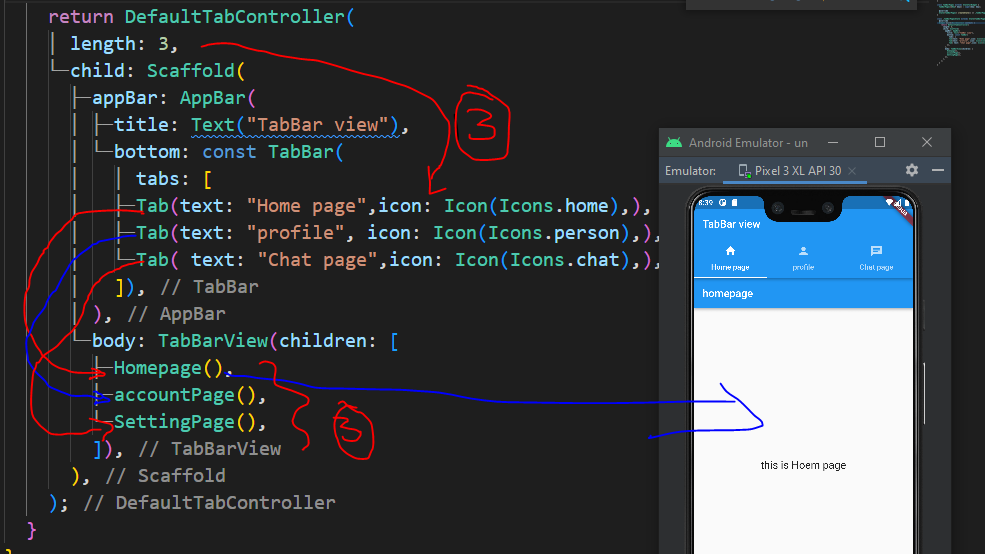
Step one: Create a simple TabBar using DefaultTabController Widget,
Wrap The Scaffold
widget by DefaultTabController and Specify the Length Property
of DefaultTabController. You Can Create The List of Tab Under the
Bottom Property of the Appbar, and also you can also Creare a list of
TabBarView Under The Body Property of the Scaffold.
keep in mind that, the length property of DefaultTabController must equal to the number
of Tab you created under the bottom properties of AppBar, and also equal to the
number of TabBarView, that is created under the body property of the Scaffold
Here Is The full Sorce code of Simple TabBAR

Step Two: Sometimes you may need to move to the next tab with the click of a button. here’s how you do that.
Changing tabs programmatically
Most of
the time, we need more than just a basic TabBar. changing the tab
programmatically and being able to listen to the Tab change event is crucial
for the app.
Now let us see how to create TabBar where you want to move to the next tab with
the click of a button. or next button we can achieve that too let's see how it works
here is a demo of what we can archive next
to achieve this first remove the DefaultTabController and its length property from the above code and we can create a custom TabController and
we initialize the length of the Tab inside
initState method, and place this TabController
inside TabBar and TabBarView
as you can see in the
below code i initialize the initialindex variable
to zero and assign it to the Initial TabController index inside inItState
method
here is a full code: if you want to watch the video Click Here
Listening for tab change event
you may want to perform some operations when a
specific tab is open. this callback comes in handy when you want to perform or
initialize something when a particular tab,
if you want to perform when a particular Tab is opened you can listen which Tab is opened using the following method a and perform
whatever you like
to listen for the Tab change event, you can create _controller.addListener(() {})
Inside InitState and perform whatever you want
@override
void initState() {
  // TODO: implement initState
  super.initState();
  _controller = TabController(length: 5, vsync: this);

  _controller.addListener(() {
    setState(() {
      _selectedIndex = _controller.index;
    });
    print("Selected Index: " + _controller.index.toString());
  });
}
Tip: If you implement onTap of TabBar for the tab change event, like this:
bottom: TabBar(onTap: (){

},
…you won’t get a callback when you swipe the tab bar with your finger. That’s why it’s always better to add a listener to get notified.


Leave a Comment